Thursday, July 20, 2023

How to integrate Synapse pipeline with Cosmos DB


How to integrate Synapse pipeline with Cosmos DB


Prerequisite

  • You have account in Azure
  • You have Contributor role on the resource group pertaining to Synapse workspace and Cosmos DB
  • You already has Cosmos DB create with Database.

Initial setup with Private link

Before you connect to Cosmos DB connect setup a linked Service in Synapse to Cosmos DB

1. Open Synapse workspace and go to Linked Service under Manage option [this icon in right side] 


2. Click on New and search for “Cosmos” and select Azure Cosmos DB for NoSQL”


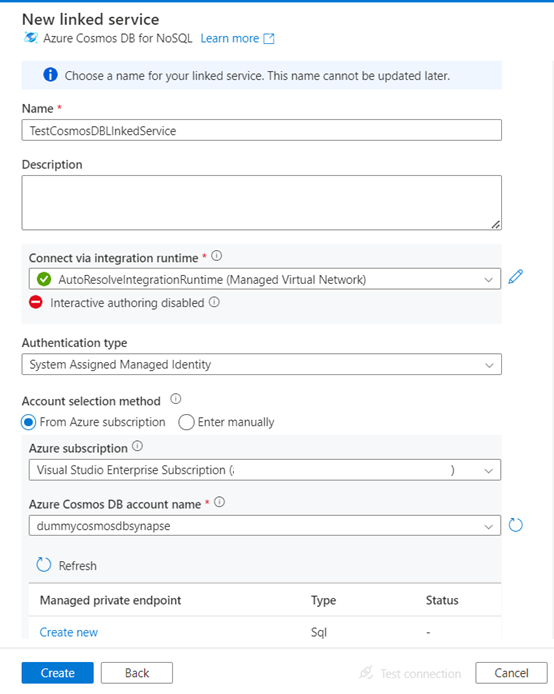
2. Fill up the necessary details as followings,


Azure Cosmos DB for Linked Service


3. To test the connection enable Interactive Authoring as following from the following screen,


4. Select Enabled and Apply. This is valid for one hour.


5. After enabling Interactive authoring Test the Linked service to confirm whether connectivity was successful. Incase failure, for e.g. with following error,


CosmosDbSqlApi operation Failed. ErrorMessage: Request blocked by Auth dummycosmosdbsynapse : Request is blocked because principal [----] does not have required RBAC permissions to perform action [Microsoft.DocumentDB/databaseAccounts/readMetadata] on resource [/]. Learn more: https://aka.ms/cosmos-native-rbac.

ActivityId: 4ba817bc-fef0-424b-aa05-445d04d81228, Microsoft.Azure.Documents.Common/2.14.0, Windows/10.0.17763 cosmos-netstandard-sdk/3.19.3.

Request blocked by Auth dummycosmosdbsynapse : Request is blocked because principal [----] does not have required RBAC permissions to perform action [Microsoft.DocumentDB/databaseAccounts/readMetadata] on resource [/]. Learn more: https://aka.ms/cosmos-native-rbac.

ActivityId: 4ba817bc-fef0-424b-aa05-445d04d81228, Microsoft.Azure.Documents.Common/2.14.0, Windows/10.0.17763 cosmos-netstandard-sdk/3.19.3

 Activity ID: 114be62d-0f3b-47f5-b127-d85cced834c3.


👀This error message says synapse workspace/Service Principal does have access to CosmosDB. Which means we need assig role to Synapse service principal.


To do so we need to run few Azure command which can be done through automation but for sake of understanding , I will be showing how to do it using Powershell from Azure Command Shell. The steps will be followings,

1.      1. Create custom role which is having permission to CosmosDB for readMetadata,execute and readchangefeed, item Assign the custom role to Synapse principal in Cosmos DB role assignment

2.      2. Check if assignment is success full

Followings are 3 script to perform the same

2.1 Create Custom Role using following steps

2.2 Open Azure Shell from top left


2.3 And Copy paste the following code,

$resourceGroupName="rg-dev-synapse" #rg of synpase ws

$accountName="dummycosmosdbsynapse" #Cosmos DB account Name


New-AzCosmosDBSqlRoleDefinition -AccountName $accountName `

    -ResourceGroupName $resourceGroupName `

    -Type CustomRole -RoleName TestAllRole `

    -DataAction @( `

        'Microsoft.DocumentDB/databaseAccounts/readMetadata',

        'Microsoft.DocumentDB/databaseAccounts/sqlDatabases/containers/items/read', `

        'Microsoft.DocumentDB/databaseAccounts/sqlDatabases/containers/executeQuery', `

        'Microsoft.DocumentDB/databaseAccounts/sqlDatabases/containers/readChangeFeed') `

    -AssignableScope "/"


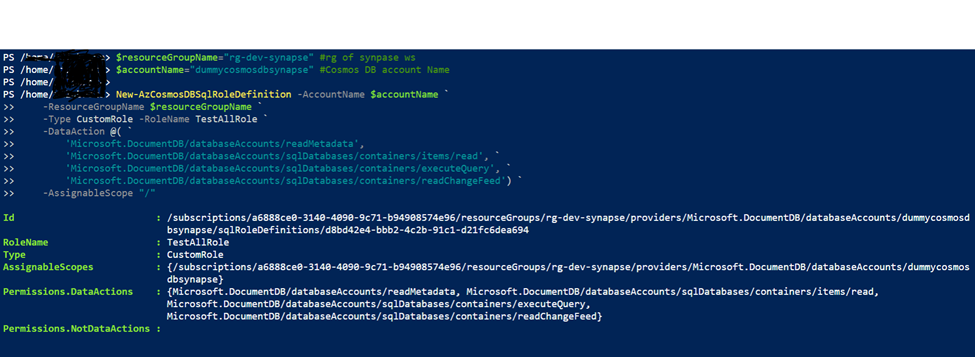
Output of Create custom role


2.4 Run the following command to check whether following role is created in same Azure Shell Session,


az cosmosdb sql role definition list --account-name $accountName --resource-group $resourceGroupName


2.5 Assign Custom role to Synapse Principal. Run the following code in Azure Shell under same session,

$resourceGroupName = "rg-dev-synapse"

$accountName = "dummycosmosdbsynapse"

$readOnlyRoleDefinitionId = "d8bd42e4-bbb2-4c2b-91c1-d21fc6dea694" # This can be found using above command

# For Service Principals ID you can find it home page of the Synpase WS[See the home page screen shot below]

$principalId = "54d15205-5789-48d8-869e-1381092fb7ce"

New-AzCosmosDBSqlRoleAssignment -AccountName $accountName `

    -ResourceGroupName $resourceGroupName `

    -RoleDefinitionId $readOnlyRoleDefinitionId `

    -Scope "/" `

    -PrincipalId $principalId


Output: Note the similar Yellow mark id which will be used later


<#


Id               : /subscriptions/<some-guid>/resourceGroups/rg-dev-synapse/providers/Microsoft.DocumentDB/databaseAccounts/dummycosmosdbsynapse/s

                   qlRoleAssignments/511ba438-eea3-4343-8a92-c0d482e918c1

Scope            : /subscriptions/<some-guid>/resourceGroups/rg-dev-synapse/providers/Microsoft.DocumentDB/databaseAccounts/dummycosmosdbsynapse

RoleDefinitionId : /subscriptions/a<some-guid>/resourceGroups/rg-dev-synapse/providers/Microsoft.DocumentDB/databaseAccounts/dummycosmosdbsynapse/s

                   qlRoleDefinitions/d8bd42e4-bbb2-4c2b-91c1-d21fc6dea694

PrincipalId      : 54d15205-5789-48d8-869e-1381092fb7ce


#>

2.6 If you check the output of the above create command, you would find the role definition ID which can be used to check if role assignment was successful using following command,


az cosmosdb sql role assignment exists --account-name $accountName --resource-group $resourceGroupName --role-assignment-id 511ba438-eea3-4343-8a92-c0d482e918c1


Create Synapse Pipeline

1.      Once linked service is connectivity is successful with Cosmos DB then create a Synapse pipeline to test out whether the data retrieval is successful.


2.      Create New pipeline from Synapse Integrate Option


3.      Drag and drop Lookup activity from General Option,


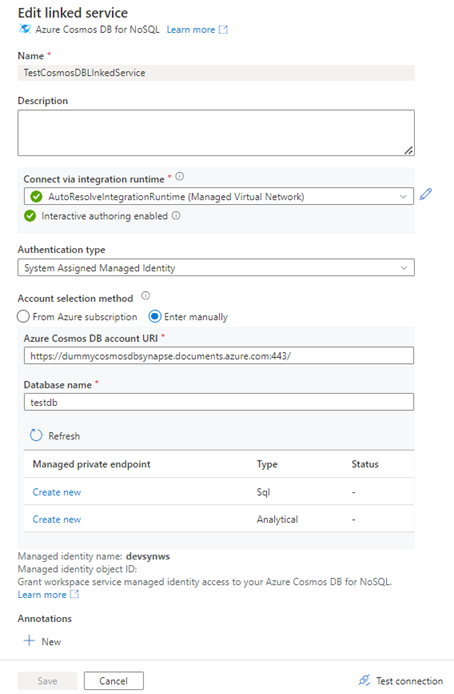
4.      Now Add Dataset from Settings tab. Here if you do not have existing dataset , create new


Edit Linked Service


5.      Select Query Option from following


6.      Now click on Validate to find any issue with pipeline and then publish it by clicking on publish All


7.      Debug the pipeline to see if you are able to retrieve the data from Cosmos


Click on output to see the data received from DB


8.       


Conclusion

The above steps show how setup Synapse pipeline with Cosmos DB and how to assign Custom Role in Cosmos DB side to get the access from Synapse work space.


For more details , you can check following link,

 az-cosmosdb-sql-role-assignment-exists

how-to-setup-rbac-CosmosDB


End of Document


Sunday, July 16, 2023


Understanding Generics in C#


Generics in C# is a powerful feature that allows developers to create classes and methods that can operate on different data types. It provides a way to make code type-safe and reusable by allowing the creation of classes and methods that can work with any data type. In this article, we will explore the basics of Generics in C#, how to use them, and when to use them.

What are Generics in C#?

Generics in C# is a type parameterization feature that enables the creation of classes, interfaces, and methods that can work with different data types. Generics provide a way to create type-safe and reusable code by allowing the creation of classes and methods that can work with any data type.

To understand Generics in C#, consider the following example:


In this example, the AreEqual method compares two integers and returns a boolean value based on the comparison. However, if we try to compare strings using this method, it will not work. One solution is to use the object type instead of integers, but this involves boxing and impacts performance.

A better solution is to use Generics. Generics can be applied to methods or classes. Let's make the AreEqual method generic:


Now, the method can compare any type T. You can use the Calculator class like this:


By making the class generic, all methods inside the class also become generic. Generics allow for type-independent and type-safe methods, making them a powerful tool in .NET development.

How to Use Generics in C#?

To use Generics in C#, we need to define a type parameter in the class or method signature. The type parameter can be any valid C# identifier. The type parameter is enclosed in angle brackets <> and is followed by the type parameter name. Here is an example of a generic class:


In this example, we have defined a generic class Stack<T>. The T represents a type parameter that can be replaced with any valid data type at runtime. The class contains an internal array _items that can hold any data type. The Push method adds an item to the stack, and the Pop method removes and returns the last item in the stack.

To use the Stack class, we need to specify the data type when we create an instance of the class. Here is an example:


In this example, we have created two instances of the Stack class, one for int and another for string. We have pushed some items to the stack and popped them to demonstrate how the class works.

When to Use Generics in C#?

Generics in C# are useful in situations where we need to create type-safe and reusable code. Here are some scenarios where Generics can be used:

Collections

Generics in C# are widely used in collections. The List<T>, Dictionary<TKey, TValue>, and Queue<T> classes are examples of Generics-based collections. Generics provide a way to create type-safe collections that can store any data type.

Algorithms

Generics in C# are also useful in algorithms that operate on different data types. For example, the Sort<T> method in the Array class uses Generics to sort arrays of any data type.

A Generic Repository

Generics in C# can be used to create a generic repository that can work with any data type. A repository is a design pattern that provides an abstraction layer between the application and the data store. By using Generics, we can create a repository that can work with any data type and can be easily extended to support new data types.

Conclusion

Generics in C# is a powerful feature that allows developers to create classes and methods that can operate on different data types. Generics provide a way to create type-safe and reusable code, making them a powerful tool in .NET development. By using Generics, we can create collections, algorithms, and repositories that can work with any data type.

Tuesday, July 11, 2023

Azure Managed Identity


Azure Managed Identity

Introduction

Azure Managed Identity is a new Azure service that provides you with single sign-on capabilities. With Azure Managed Identity, you can manage multiple applications and services without creating new accounts. The first step when using Azure Managed Identity is to create a common identity. This is the account that your users access to sign in. When your users access a resource through Azure Managed Identity, they are not prompted for credentials each time. Instead, they are asked only once to sign in and this process creates a session cookie that persists across their interactions with your applications. The session cookie remains valid for up to 10 hours by default and can be managed by setting policies on the common identity provider (CIP). You can also configure Azure Active Directory (Azure AD) conditional access rules based on whether or not the user has signed into your resources through Managed Identity with out-of-scope directives such as 'sign-on' or 'admin'

Azure Managed Identity is a new Azure service that provides you with single sign-on capabilities.

Azure Managed Identity is a new Azure service that provides you with single sign-on capabilities. It allows you to manage multiple applications and services without creating new accounts, which makes it easier for users to access all of their resources in one place. This article explains what Azure Managed Identity is, how it works, and why it's beneficial for your organization.

With Azure Managed Identity, you can manage multiple applications and services without creating new accounts.

Azure Managed Identity is a new Azure service that provides you with single sign-on capabilities. With Azure Managed Identity, you can manage multiple applications and services without creating new accounts.

How does it work?

When you sign up for the service, you get an identity provider (IdP) at no extra cost. The IdP allows users to access multiple apps via one account instead of having separate logins for each app or service they use. This makes life easier on users because they don't have to remember passwords or create new accounts every time they want access to something new--it's all handled through their existing credentials at their company's IdP.

The first step when using Azure Managed Identity is to create a common identity. This is the account that your users access to sign in.

A common identity is the account that your users access to sign in. The common identity can be created in Azure AD or any other CIP (such as Google). When you create a new common identity, it will automatically be configured for use with Azure AD as the default CIP.

To configure your managed service provider (MSP) to work with Azure Managed Identity, you'll need to set up some user credentials for each tenant that uses MSPs. These credentials are stored on-premises and used by MSPs when they access resources such as Office 365 mailboxes (or other services like SharePoint).

You can manage these credentials using either:

  • The new Azure portal experience

  • PowerShell cmdlets

When your users access a resource through Azure Managed Identity, they are not prompted for credentials each time. Instead, they are asked only once to sign in and this process creates a session cookie that persists across their interactions with your applications.

When your users access a resource through Azure Managed Identity, they are not prompted for credentials each time. Instead, they are asked only once to sign in and this process creates a session cookie that persists across their interactions with your applications.

By default, the session cookie remains valid for up to 10 hours by default or until it expires if you do not renew it within that time period. You can manage the policies of the common identity provider (CIP) by setting them on the CIP itself or through policy-based configuration in your application settings.

The session cookie remains valid for up to 10 hours by default and can be managed by setting policies on the common identity provider (CIP). You can also configure Azure Active Directory (Azure AD) conditional access rules based on whether or not the user has signed into your resources through Managed Identity with out-of-scope directives such as 'sign-on' or 'admin'.

Oops! Click Regenerate Content below to try generating this section again.

It's easier than ever before to protect your organization's identity data by using the latest cloud technologies

Azure Managed Identity is a new Azure service that provides you with single sign-on capabilities. With Azure Managed Identity, you can manage multiple applications and services without creating new accounts. The service automatically signs users in to their preferred apps and services using the same credentials they use to sign in to Azure Active Directory (Azure AD) or other Microsoft identity solutions such as Office 365.

It's easier than ever before to protect your organization's identity data by using the latest cloud technologies like Azure Active Directory Premium, which includes features such as Privileged Access Management (PAM) 2.0 and Multi-Factor Authentication (MFA).

Conclusion

This is built on top of Azure AD and offers a simpler way for you to manage multiple applications and services without creating new accounts.


FAQ

  1. Q: What is Azure Managed Identity for Developer?
    A: Azure Managed Identity for Developer is a service that provides an identity for your application to authenticate and access Azure resources securely, without the need for managing credentials.

  2. Q: What programming languages are supported by Azure Managed Identity for Developer?
    A: Azure Managed Identity for Developer supports multiple programming languages including .NET, Java, Python, JavaScript/Node.js, and PowerShell.

  3. Q: How does Azure Managed Identity for Developer work?
    A: Azure Managed Identity for Developer works by enabling your application to obtain an identity token from Azure Active Directory (AD) and using that token to authenticate requests to Azure resources.

  4. Q: When should I use Azure Managed Identity for Developer?
    A: You should use Azure Managed Identity for Developer when you want to authenticate your application to access Azure resources without managing credentials, improving security and ease of management.

  5. Q: Can I use Azure Managed Identity for Developer with Azure services?
    A: Yes, Azure Managed Identity for Developer can be used with various Azure services such as Azure Virtual Machines, App Service, Azure Functions, Azure Key Vault, and Azure SQL Database.

  6. Q: Do I have to manually rotate credentials with Azure Managed Identity for Developer?
    A: No, with Azure Managed Identity for Developer, you don't need to manually rotate credentials as the identity is automatically managed by Azure.

  7. Q: Can I use Azure Managed Identity for Developer in my local development environment?
    A: Yes, you can use Azure Managed Identity for Developer in your local development environment. The Azure SDKs and CLI provide tools and libraries to enable this integration.

  8. Q: Is Azure Managed Identity for Developer free to use?
    A: Yes, Azure Managed Identity for Developer is free to use. However, there may be associated costs with using Azure resources that your application accesses.

  9. Q: Can I assign roles and permissions to Azure Managed Identity for Developer?
    A: Yes, you can assign roles and permissions to Azure Managed Identity for Developer through Azure RBAC (Role-Based Access Control). This allows you to control the level of access your application has to Azure resources.

  10. Q: How can I authenticate and authorize my application using Azure Managed Identity for Developer?
    A: You can authenticate and authorize your application by obtaining an access token using Azure Active Directory libraries, and then using that token to call Azure services. The identity token is automatically managed by Azure.

Azure login steps


Azure Login: A Comprehensive Guide to Accessing Your Account

Image Source: FreeImages

Azure is a powerful cloud computing platform that offers a wide range of services and resources. To make the most out of Azure, you need to know how to log in and access your account. In this comprehensive guide, we will walk you through the steps to login into Azure using a web browser and PowerShell. By the end of this article, you will have a clear understanding of how to access your Azure account seamlessly.

Table of Contents

  1. Using a Web Browser
  2. Using PowerShell
  3. Conclusion

Using a Web Browser

Logging into Azure using a web browser is a straightforward process. Follow the step-by-step instructions below to access your Azure account.

Step 1: Open a Web Browser

To begin the Azure login process, open your preferred web browser, such as Chrome, Firefox, or Edge. Ensure that you have a stable internet connection.

Step 2: Enter Azure Account Email Address

Navigate to the official Azure portal by entering portal.azure.com in the address bar of your web browser. You will be directed to the Azure portal login page.

Step 3: Enter Azure Account Password

On the Azure portal login page, enter the email address associated with your Azure account. Click "Next" to proceed to the next step.

Step 4: Multi-Factor Authentication

If you have enabled multi-factor authentication (MFA) for your Azure account, you may be prompted to verify your identity using the registered method. This can include a phone call, text message, or authentication app. Follow the instructions provided to complete the verification process.

Step 5: Access Azure Portal Dashboard

Once you have successfully authenticated, you will be redirected to the Azure portal dashboard. This dashboard serves as your gateway to various Azure services and resources. Here, you can manage your virtual machines, databases, storage accounts, and more.

Azure Portal Dashboard

Using PowerShell

If you prefer using PowerShell for command-line automation, you can also login to Azure using this powerful tool. Follow the steps below to get started.

Step 1: Open PowerShell

To begin the Azure login process using PowerShell, open the PowerShell application on your local machine. Ensure that you have the latest version of PowerShell installed.

Step 2: Install Azure PowerShell Module

If you haven't already installed the Azure PowerShell module, you will need to do so. Run the following command in PowerShell to install the module:

Install-Module -Name Az -AllowClobber -Scope CurrentUser

This command will download and install the Azure PowerShell module on your machine.

Step 3: Import Azure PowerShell Module

After the installation completes, you need to import the Azure PowerShell module. Run the following command in PowerShell:

Import-Module Az

This command will import the Azure PowerShell module, enabling you to utilize Azure commands within PowerShell.

Step 4: Login to Azure

To login to Azure, use the following command in PowerShell:

Connect-AzAccount

This command will initiate the login process and open a web browser window.

Step 5: Authenticate via Web Browser

In the web browser window that opens, enter the email address associated with your Azure account and click "Enter". Then, enter your Azure account password and click "Enter" again.

If you have enabled multi-factor authentication, follow the prompts to complete the verification process.

PowerShell Azure Login

Step 6: Confirmation in PowerShell

Once you have successfully authenticated, you will receive a confirmation message in PowerShell. You are now logged into Azure using PowerShell and can start leveraging its powerful automation capabilities.

Conclusion

In this comprehensive guide, I have covered the steps to login into Azure using a web browser and PowerShell. Whether you prefer the convenience of a web browser or the automation capabilities of PowerShell, Azure provides flexible options for managing your cloud environment. By following the instructions outlined in this guide, you can seamlessly access your Azure account and take advantage of the wide range of services and resources it offers.

Please note that the screenshots used in this guide are for illustrative purposes and may not reflect the exact appearance of the Azure portal or login process at the time of reading.